My First WebApp
This tutorial explains how to implement your first webapp on appserver.io from scratch using the Servlet-Engine mixed with Dependency Injection and Session-Bean integration.
Prerequisite
First you will need a running installation of appserver.io (>= Version 1.0.0-rc3). If you are new to this project you can easily download and follow the installation guide for your specific OS.
Preparations
At first switch to dev mode in our local appserver.io installation. This will set the correct filesystem permissions for your user account and also let the appserver process itself run as the current user. This will make it easy for local development.
sudo /opt/appserver/server.php -s dev
# Should return: Setup for mode 'dev' done successfully!
Now you are ready to create the webapp called myapp
# Goto appserver.io webapps folder
cd /opt/appserver/webapps/

# Create myapp
mkdir myapp

# Go into myapp
cd myapp

# Open it with your favorite editor if you want to...
pstorm .
brackets .
atom .
Keep the webapp under version control from the early beginning, so that you always have a chance to rollback things and maybe push it finally to GitHub with all the history in it if you want to.
git init

# Some default git ignore stuff
echo ".idea\n/vendor\ncomposer.lock" > .gitignore

# Do initial commit
git add .
git commit -m "initial commit"
Hello-World Script
The simplest way to echo things like Hello-World to the client is the way you already know. Using a simple PHP script.
So check if that works in appserver and create a PHP script called hello.php directly in the webapps folder /opt/appserver/webapps/myapp.
<?php echo "hello i'am a simple php script"; ?>Open the browser at [http://127.0.0.1:9080/myapp/hello.php] and you should get...

Wooow it works... looks great :)
# Commit the current state via git.
git add .
git commit -m "added hello-world script"
Hello-World Servlet
Ok now do the same thing using the Servlet-Engine by creating your first simple Hello-World Servlet. In the
beginning create the WEB-INF/classes folder where all Servlets are. In this folder the namespaces
and classes MUST follow an autoloading PSR: PSR-0.
PSR-4 support is coming in one of the next appserver.io releases.
If our vendor name is MyVendor the folder should look like WEB-INF/classes/MyVendor/MyApp
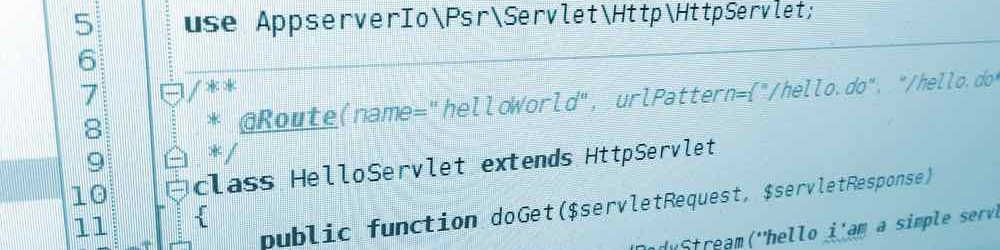
mkdir -p WEB-INF/classes/MyVendor/MyAppFinally we introduce our servlet by creating a PHP class file called HelloServlet.php in that folder.
<?php

namespace MyVendor\MyApp;

use AppserverIo\Psr\Servlet\Http\HttpServlet;

/**
 * @Route(name="helloWorld", urlPattern={"/hello.do", "/hello.do*"})
 */
class HelloServlet extends HttpServlet
{
    public function doGet($servletRequest, $servletResponse)
    {
        $servletResponse->appendBodyStream("hello i'am a simple servlet");
    }
}
Due to the reason that servlets are pre-initialised by the servlet-engine at the appserver.io startup it is necessary to restart the appserver every time it is needed to test the recent changes. Here is a short overview how to restart.
# OSX
sudo /opt/appserver/sbin/appserverctl restart

# Debian / Ubuntu / CentOS
sudo /etc/init.d/appserver restart

# Fedora
sudo systemctl restart appserver
After the appserver has restarted goto [http://127.0.0.1:9080/myapp/hello.do] and you should get...
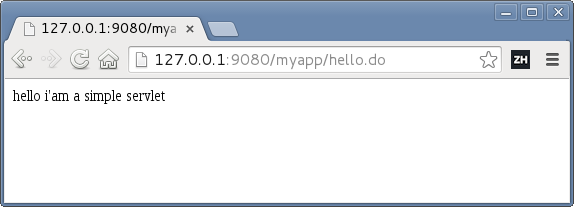
Strike! :)
# Commit the current state via git.
git add .
git commit -m "added hello-world servlet"
Using Services
As the most business logic should be separated into services now implement a simple HelloService which is getting
inject into the HelloServlet via Dependency-Injection.
To use Dependency-Injection you have to put the service classes at META-INF/classes where the namespaces
and classes MUST also follow an autoloading* PSR: PSR-0.
mkdir -p META-INF/classes/MyVendor/MyAppLet us introduce the HelloService which provides the getHelloMessage() method that returns the hello-world message
that the servlet should serve to the client. Create a PHP class file called HelloService.php in folder META-INF/classes/MyVendor/MyApp
<?php

namespace MyVendor\MyApp;

/**
 * @Stateless
 */
class HelloService
{
    public function getHelloMessage()
    {
        return "hello i'am a simple servlet with service usage";
    }
}
To inject the HelloService into the HelloServlet add an annotated property $helloService and modify the doGet
method to make use of the injected service instance. The HelloServlet should now look like this...
<?php

namespace MyVendor\MyApp;

use AppserverIo\Psr\Servlet\Http\HttpServlet;

/**
 * @Route(name="helloWorld", urlPattern={"/hello.do", "/hello.do*"})
 */
class HelloServlet extends HttpServlet
{
    /**
     * @EnterpriseBean(name="HelloService")
     */
    protected $helloService;

    public function doGet($servletRequest, $servletResponse)
    {
        $servletResponse->appendBodyStream(
            $this->helloService->getHelloMessage()
        );
    }
}
Restart the appserver again and refresh the browser at [http://127.0.0.1:9080/myapp/hello.do]. Here you go...
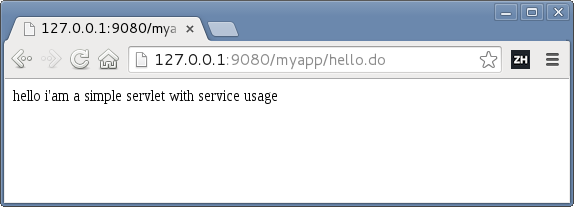
And here it is... Your First WebApp on appserver.io!
# Commit the current state via git.
git add .
git commit -m "added hello-world service and enhanced servlet"
Feel free to enhance it and let us know what you have built upon the next PHP infrastructure!
Annotations! But why?
To use servlets without configuration, it is necessary to add a @Route annotation so the servlet-engine is able to map a specific url to the servlet.
<?php
/**
 * @Route(name="helloWorld", urlPattern={"/hello.do", "/hello.do*"})
 */
 class HelloServlet extends HttpServlet
This annotation maps the URL http://127.0.0.1:9080/myapp/hello.do and http://127.0.0.1:9080/myapp/hello.do/anything/you/want to the servlet.
For more servelt details checkout out Servlet Engine
section in our Documentation
You also use annotations to use Dependency-Injection. To make our HelloService injectable add an annotation
above the class definition. In this case we want to have a stateless Session-Bean so put @Stateless to class doc block.
<?php
/**
 * @Stateless
 */
class HelloService
To inject our HelloService to the HelloServlet via Property-Injection we just have to put the annotation above the member property like this...
<?php
class HelloServlet extends HttpServlet
{
    /**
     * @EnterpriseBean(name="HelloService")
     */
    protected $helloService;
Okay, folks that is all!
We hope this tutorial helps you to have a smooth start into the world of appserver.io webapps!
Any feedback is appreciated so do not hesitate to share your experiences or any problems you encounter with us. Cheers! :)
Please note that by clicking "Load Comments", your browser will establish a connection with servers from Disqus.
For more information, please visit our privacy statement.